Tuesday, July 19, 2011

Kingston Biscuits

17 Comments
There’s something quite amazing about having a cake, biscuit or something else you love eating coming straight out of your own oven, instead of some thin plastic packaging. I love the whole process- starting with very simple ingredients like flour and sugar, slowly mixing them together to create a batter or a dough of some sort and then watching as they transform into something delicious. It’s the reason that I spend so much effort baking things which would be so much more convenient or cheaper (or perhaps, though not likely, taste better) to buy from the shops.


I love pretty much all recipes, and particularly love recipes for things I love to eat (duh!), but whenever I open up a recipe book or am reading food blogs, what draws my attention the most are recipes which attempt to recreate some dish or snack. Even if what they’re trying to recreate is something I’ve never heard of or had before- if it’s good enough that someone can be bothered trying to make it themselves at home, then I’m interested.

So after I saw these Kingston biscuits on Julia’s blog, this recipe remained in the back of my mind until I finally decided making them. You see, when I was reading the post (a year ago) I wasn’t too fond of Arnott’s Kingston biscuits. Actually, I wasn’t too sure I’d had them before, but I don’t have much of a thing for sandwiched cream biscuits (with the exception of oreos!). I guess I have to thank the supermarkets for putting these biscuits on sale- otherwise I would never have thought of buying them to try. Not only did I discover I liked them (a lot!) but so did my sister!


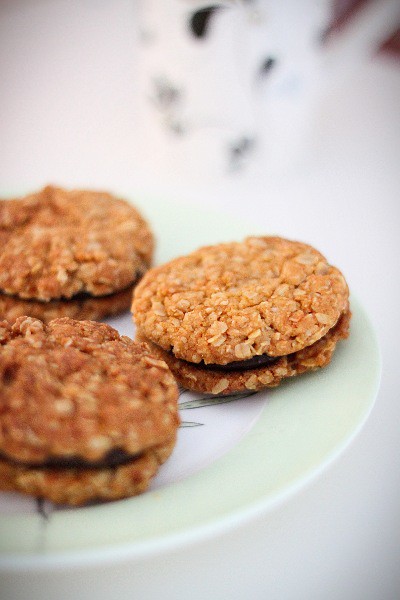
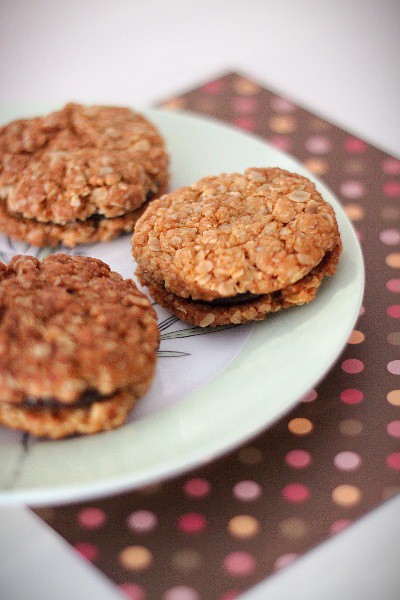
These Kingston biscuits are quite different as the packaged ones, but then again I guess that’s the beauty of homemade recipes- they taste similar enough that you can recognise that it to be a version of the well known biscuit but are in many other ways, so different. For one thing, these don’t look much like Kingston’s- they’re larger (mostly my fault because I didn’t realise they’d expand so much) and I guess chunkier because of the oats. They’re also less crunchy than the packaged ones, though I guess you could bake them for longer if you like your biscuits super crunchy, and they soften over the next few days to create slightly chewy cookies. And of course, they taste different. But in a good way of course.

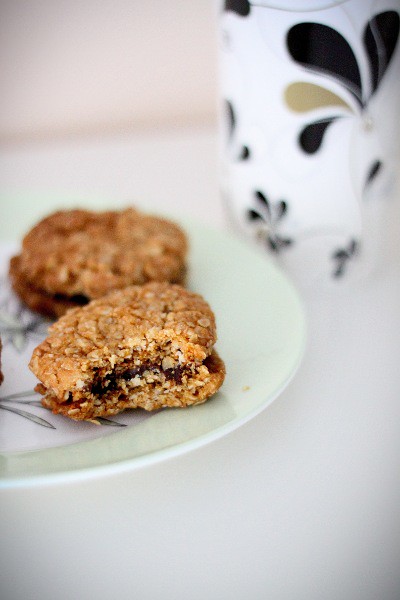
I sandwiched these biscuits with ganache instead of chocolate because I like the smoothness of ganache but it takes quite a while for it to cool and harden completely so for the first couple of hours after sandwiching them, the biscuits sort of slide over each other and the chocolate filling is very smooth and almost runny- it’s so good! Not that they taste any less delicious when it hardens- infact, my sister likes the biscuit better the next couple of days when the cookie softens slightly. Either way, our general consensus is that these homemade Kingston’s are terribly addictive and even better than the packaged ones- we even have two untouched packaged ones sitting in our pantry to prove it!


Kingston Biscuit Recipe
Adapted from Mélanger- thanks Julia! (sorry that half of the measurements are in grams and the other half is in cups- I sorta fiddled around with the recipe as I went!)

90g butter 45g golden syrup (I used honey)
1/2 teaspoon bicarb soda

1 cup rolled oats
1/2 cup demerara sugar
1/2 cup plain flour
1 cup dessicated coconut


100g chocolate (I used dark chocolate)
80ml cream (that's all I had in my fridge- and it worked out pretty well!)


1. Preheat oven to 160C. Cream butter, sugar and golden syrup until pale and fluffy.
2. Add flour, bicarb soda, coconut and rolled oats, and beat on slow speed until just combined.
3. Drop teaspoons of mixture onto paper lined trays. Bake in oven for 15 minutes or golden.
4. For the filling, Combine chocolate and cream in a small heatproof bowl; stir with metal spoon over pan of simmering water until melted and smooth. Refrigerate until spreadable then sandwich biscuits together. Can be kept in an airtight container for up to 5 days.

Wednesday, July 13, 2011

Mamak Village

5 Comments

I’d been meaning to try out Mamak Village for a while (especially after Alison recommended it!), so when my friend revealed that she had never been to a Malaysian restaurant before, I quickly suggested we come here for our next lunch together. A short walk from uni, we find ourselves at the entrance, looking at a closed sign. It’s strange to think that I ate lunch at 11 in the morning when I was at uni- I only wake up at that time now! Just as we begin walking away however, the blinds are opened and the restaurant is opened- yay!

Roti canai ($4)

We couldn't come here without ordering the roti, of course, and we chose the most basic roti canai to share between us. It is crisp and flaky, though not quite as much as Mamak’s (is it even possible not to compare any roti with mamak’s?), but every bit as exciting and satisfying! The curries were also delicious, though we couldn’t quite figure out what the middle sauce was, and we had no problem mopping just about all of it up!

Mee Siam $9.50

The rest of the menu was a little more difficult to choose from, only because of the large variety of dishes on offer. Luckily, they have pictures on the back of the menu, and I automatically go for the Mee siam. The vermicelli stir fry is nice and dry, with big chunks of prawns, crunchy bean sprouts and lettuce to accompany the tasty noodles.

Nasi Lemak $10

We decide to order the Nasi Lemak because we wanted something with rice and this had a thumb next to it on the menu :D We ordered it with chicken curry (instead of beef rendang) which comes as a tasty drumstick which is tender enough to be easily split into two halves by a spoon. As surprising as it may seem, this is my first taste of Nasi Lemak- and I loved it! The coconut rice was delicious enough to enjoy by itself and I loved trying out each of the accompanying components to see which one I liked the best (I think it would have to be the anchovies!)

We leave feeling full and satisfied- and me with intentions of coming back here more often! If you have any suggestions for good restaurants near Sydney uni, leave a comment- I can't wait to try more places when the next semester starts (just about the only thing I'm actually looking forward to about uni....) :)

Mamak Village on Urbanspoon

Friday, July 8, 2011

Pick Your Own Mandarins: Watkins Orchard

8 Comments

I’ve never been any good at gardening, though I’d have to admit, that may be because I can never maintain interest in caring for a plant long enough that it survives its first couple of weeks. After successfully growing leeks for agriculture in Year 8, I had a short lived interest in growing vegetables, which resulted in me attempting to grow some lettuce in our backyard. Though I carefully planted and watered them for a couple of months, they only managed to grow to about the size of a fist before they decided to stop growing.

An interest in gardening obviously does not run in our family. There was one time when my sister tried planting a couple of mandarin seeds in a pot in hopes of growing a mandarin tree, but the pot was then emptied out by my grandma when she came over the next day, thinking that it was just a pot of soil. We once had some sugar cane, tomatoes, chives and chilies in our backyard but over the years, we’ve gotten rid of them, mostly because their quality was depleting and we simply could not be bothered caring for them anymore.


So it’s not surprising that we don’t have any edible plants in our garden, much less a lemon/mandarin/orange tree, which so many people have. Luckily, there exists lovely orchards around Sydney for us to visit, whenever we feel like picking and eating fresh fruits straight off a tree- even if it means we have to drive a couple of hours to do so!

We visited Watkin’s Orchard a while ago, down at Wiseman’s ferry, a relatively short 1.5 hour drive from home. The first time went (last year), we did so on a weekday and forgot to make a booking- so we arrived to see the gate closed and the orchard, of course, empty. Luckily, the owners noticed us standing there, and opened it for us!

The imperial mandarins are in season right now- small, sweet and juicy mandarins which I think just might be my favourite! They are sold for $10 a big bucket and you're allowed to eat as many mandarins as you can while you're there :) I taste tested just about every tree I picked from (which is actually quite pointless because every mandarin on the one tree tastes different)....which was a lot of mandarins. Definitely the most mandarins I've ever eaten in one go ;)


I’ve created quite a big collection photos from our fruit picking adventures over the years- a lot of which I quite like, not because of my photography skills, but because I find orchards quite nice places in general. I’ve always wanted to blog about them, but I always end up having nothing much to say…..so I think I might just press the ‘publish’ button before I change my mind about this one! ;)

Tuesday, July 5, 2011

Squid and Seafood dumplings

18 Comments

One of the first things I did once my exams finished (*ahem* more than two weeks ago) was to bake a batch of crème caramels (which I must blog about some day….once I get it perfect!) as I’d been receiving requests from my family for them since ages ago. It’s been a while since I’ve made a relatively successful dessert and I was quite happy to be in the kitchen again measuring and whisking away. It's been quite a while since I've been in the kitchen making a nice dessert, as you may have noticed from the things I post on this blog. I do however, bake and cook a lot more than I blog- don’t worry, I haven’t completely stopped baking! I’ll admit that I’ve been quite lazy with blogging this year and too often, just can’t be bothered to photograph food nicely or to write something which doesn’t make me sound like an idiot (which, might I add, takes quite a lot of effort!) to publish here.

IMG_5897

My second creation of these holidays, which I'm quite proud of, are these squid shaped (yess....they're supposed to look like squid!) shrimp dumplings, which took me and my mum about 1.5 hours to make! The recipe comes from a cookbook I bought at the airport at the beginning of the year, on the way back from Hong Kong, Trendy Dim Sum in Hong Kong . Dim sum is one of my favourite things to make (though probably not as much as desserts and pastries!), despite me not liking yum cha that much, because it's a really category of its own- with its unique techniques and methods, some of which are quite challenging.

I've been itching to try some recipes from this particular book though, because it has got to be the most creative dim sum book I've ever seen. Think pea shaped dumplings, turtle shaped pastries, chrysanthemum pastries just to name a few!

Dumplings before streaming

My mum often makes har gow (steamed prawn dumpling) at home, from a trusty recipe she obtained from a cooking course she attended ages ago (which I might have to share here some day) so making these dumplings wasn't too much of a challenge for us. The dough/wrapper was a little different in this recipe because it's supposed to be a crystal wrapper- that is, it's supposed to be transparent. Which didn't exactly happen to ours, as you can see in the pictures, and the addition of a tapioca starch paste to the dough made it incredibly sticky and difficult to handle. We didn't exactly follow the recipe because we didn't have a whole lot of seafood in our pantry so we basically made the filling with prawns and water chestnuts and minced some squid to stick all the filling ingredients together.

The squid shape was a lot harder to make than it looked and we ended up using so much time to perfect our squid shapes- probably a lot more time than it was worth but it was fun! They didn't end up tasting as good as the har gow we usually make from my mum's recipe but still quite good. And I thought they were pretty cute too!

IMG_5890
Squid and Seafood Dumplings
Recipe from Trendy Dim Sum in Hong Kong

Crystal Wrapper
(A)
75g tapioca starch (can substitute with corn flour)
114g water
225g boiling water

(B)
150g wheat flour/starch (tang flour)
225g boiling water

Filling
300g chopped squid
300g cuttlefish
38g cooked shark's fin
38g diced water chestnut
38g soaked white fungus
19g diced spring onion
19g diced bell pepper

Seasoning
4g salt
8g MSG
15g grandulated sugar
19g corn flour
19g oil

Some black sesame seeds for making the eyes

Crystal Wrapper
1. Mix the water and tapioca starch of (A) together. Then add in the boiling water, stir until the starch becomes half done. (I'm not quite sure what it means exactly by half done, but this should be a thick paste)
2. Pour the boiling water of (B) into the wheat flour until totally done (this should become a thick paste)
3. Mix the above mixtures together and knead the mixture into a smooth dough. Then divide to 20 portions, 11g each. Roll them into round, thin slices. We didn't bother weighing the dough out- we divided them into fishball sized portions.

Combining
1. Wash the squid, mince and strir vigorously until sticky, add in the seasoning and then mix with the remaining filling ingredients. Set aside.
2. Wrap about 15g (~ 1 teaspoon) of the filling with a portion of crystal wrapper and knead into a squid shape, and then stick 2 black sesame seeds as eyes.
3. Steam in a steamer on high heat for aout 3 minutes. Serve with broth.

The shaping probably needs a bit of clarifying here. What we did was to roll the dough into a circle about the size of a mug, place the filling within and then fold it in half and pinch together the dough to seal. We then cut horizontally along the top of the semicircle so that the filling remained sealed. One of the ends of dough, we shaped into a ball, flattened slightly and then cut into strips. The other end, we pinched into point. With the extra dough we rolled that into a thin triangle and pinched it back onto the pointy end to make the tail.


P.S: Sorry for disappearing for so long- sleeping in and doing nothing just feels too good ;)
Related Posts with Thumbnails