Tuesday, September 28, 2010

Yum Cha Style Mango Pancakes

34 Comments

Mango season has hit quite early this year- although they're not exactly at their best yet, there's always a strong scent of mangoes whenever I venture into a fruit shop. I find this a little weird as I always associate mangoes with December. When I was younger, we used to take boxes of mangoes to Hong Kong for our relatives when we went there just before christmas. Back then, mangoes were at their best just before christmas and we always managed to bring some large, ripe mangoes. But it seems that the mango season is appearing earlier and earlier each year- last year, we only managed to bring a box of small end of season mangoes!


Although I prefer eating mangoes as they are, rather than using them for desserts (as I do with most fruits), my next favourite way to eat mango is in mango pancakes. Yup, the bright yellow ones they wheel around in the dessert trolley at yum cha, always covered tightly in cling wrap with water droplets hanging off the plastic.

I had these for the first time at a yum cha restaurant about 3 years ago, instantly fell in love with them and then realised how simple they were- after all, they're just a simple mixture of mangoes and whipped cream wrapped in a yellow pancake. But that never stopped me from ordering them everytime I spotted one at a restaurant. Even when it's in the middle of winter, and you know that they're using canned mangoes....


So I finally got around to making this yesterday, after seeing the two mangoes which I'd reserved (my sister used the others for mango pudding) starting to rot. I've never been able to find a mango pancake recipe on the internet, one of the resons I've been putting it off for so long, despite my love for it)so I decided to use a crepe recipe as I thought it'd be similar to the pancake I've eaten at yum cha (never mind the fact that I've never actually eaten a crepe before.....), tint it yellow and chuck some whipped cream and mango in there =D And you know what?? It worked!!

I accidently made the crepe too thick because I was scared that if it was too thin, it wouldn't taste like the mango pancakes I had before. And then I think I overcooked it because it wasn't quite as soft as I'd like it AND I also added too much food colouring so it ended up looking pretty cheap, like those ones at yum cha restaurants which you look at and know that it won't taste good but you still order cimply because it's a mango pancake, and you love mango pancake. Or is that just me? Luckily, the mangoes were really good so it didn't taste like it looked =) Infact, they were heavenly!! The mangoes are really the star of the show here so the slight problems with the crepe weren't too noticeable. And so these dissappeared in no time!

I know what I'll be doing with this season's mangoes!


Monday, September 20, 2010

Vanilla Cake for my english teacher!

25 Comments

I love the reaction I get from others when I make cake. The oohs and the aahs bring a really nice sense of satisfaction and make me really happy- even when I know the cake doesn't look that great. And although I love baking, it is really this reaction which makes even the boring and frustrating bits of baking all worthwhile.

This cake was for my english teacher, perhaps my favourite teacher- so from the beginning, it was completely worth the 4 or so hours I spent in the kitchen slowly trawling through the recipe, making sure I didn't skip a single ingredient, and the decorating after that. And it definitely was- I loved her reaction when she saw the cake- I don't really think anyone has been quite as happy and touched by my cakes before!

It certainly makes it worth the tired arms I get from whipping the batter for 10 minutes- it can get painful sometimes. It makes it worth the frustration of having to wait hours for the cake to be done and the frustration when you have a billion bowls to clean- and you don't even know how you managed to use that many =S


The reaction of my class also made it very worthwhile. Not only the oohs and aahs, especially of the butterflies, the easiest part of it (I stole the idea off Adriana- thanks!) but also the way they kept reaching for seconds. Like those who wolfed down piece after piece after piece *ahem* Andrew *ahem* ;) But I love all of this.

It really makes it worth the frustration of the egg whites not whipping up into stiff meringue- because you couldn't be bothered to clean your bowl cleanly after you used it to make the cake batter. And the consequential 10 minutes of beating in hope that it will. And then the additional 10 minutes of beating in the butter in hope that it will turn into a beautiful, smooth buttercream. It makes it worth the frustration when you realise that you don't have enough buttercream to ice the whole cake. And when the crumbs all mix with the icing to make a lumpy one- so the icing looks like a splat of...something.

But you don't notice all these imperfections when you are bathed in compliments, when you are constantly told how good the cake is. You only stop to think about whether you cake was actually that great a couple of hours later, when you think back and when you look at the picture you snapped hurriedly in the morning before rushing off to school. I guess it's all part of the experience.

Thinking back this time however, it kinda made me sad. Sad that I'll probably never have the chance to make a cake for these people again- school finishes in a few days and I'll probably never see them like this again. But I'll leave the sentimental stuff for another post, and meanwhile, spend the rest of the week treasuring out last moments of high school =)


Yellow cake
from the Better Homes and Gardens Cookbook
Makes one double layered 20 or 23cm cake

3/4 cup butter
3 eggs
2.5 cups plain flour
2.5 tsp baking powder
1/2 tsp salt
1 and 3/4 cups sugar
1.5 tsp vanilla
1 and 1/4 cups milk

1. Allow butter and eggs to stand at room temperature for 30 minutesas. In a medium bowl, stir together flour, baking powder and salt. Set aside
2. In a large mixing bowl, beat butter and sugar with an electric mixer on medium to high speed for 30 seconds. Gradually add sugar, aabout 1/4 cup at a time, beating on medium speed until well combined, scraping sides of bowl. Beat on medium speed for 2 minutes more. Add eggs, 1 at a time, beating after each addition (about 1 min in total). Beat in vanilla. Alternatively add flour mixture and milk to butter mixture, beating on low speed after each addition until just combined. Pour batter into a 20cm or 23cm round cake pan.
3. Bake in a preheated 180 degree (celcius) oven for about 12 minutes or until a wooden toothpick inserted near the centre comes out clean. Cool cupcakes and decorate with buttercream.

Swiss Meringue Buttercream
Recipe from Joepastry
4 egg whites
1 cup sugar
1/4 teaspoon cream of tartar
1 pound soft unsalted butter

1. Begin by combining the whites, sugar and cream of tartar the top of a double boiler set over simmering water. Whisk to combine them, and keep it up intermittently while the mixture warms. In about 5-7 minutes' time, your mixture should have reached 160 degrees Farhenheit (don't worry, your whites won't cook, the sugar will keep all those little proteins from clenching up). At this temperature, Salmonella bacteria are killed
2. Pour the contents of the double boiler into the bowl of a stand mixer fitted with a whip.Turn the mixer on high. In a few minutes the mixture will turn white and start to build up into a foam. Whip for about 6-8 minutes, until the meringue forms stiff peaks
3. Switch to the paddle (beater) attachment and turn the mixer to medium high. Beat in the butter a piece at a time. Whip until the mixture becomes smoother and thick.

Wednesday, September 15, 2010

Strawberry Milk Jelly

17 Comments


You can always tell a chinese recipe, if it has its ingredients separated in Part A's and B's and C's- even if each part only has one or two ingredients =)

I found this recipe at a rather unusual place- on a chinese video website, which we usually use to watch chinese news. If I translated literally from the chinese name it would become 'strawberry cold milk'- unfortunately they didn't have any english translations, so it took me a while to figure out that this was probably panna cotta (I've never had panna cotta before). EDIT: On second thoughts, this is too firm to be panna cotta- I think it's milk jelly =) Which is why I changed the title

This time, it was my mother who suggested we make this- but it's a good thing she did because it has quickly turned into a family favourite which we've made numerous times. The recipe is really simple, the way my mum likes it- it only takes 5 minutes to prepare. And it tastes really nice too! I think it's because of the simplicity of the flavours - the focus is on the light taste of the strawberries. There's nothing too surprising, but a delicious change from my normal heavier desserts- I could easily gulp down the whole batch of these =D

And so could the rest of my family, in particular, my father who keeps requesting for another batch to be made each time we buy strawberries!

Strawberry Milk Jelly

Part A
160g sugar
15g gelatine powder
150g water

Part B
5-10 strawberries, depending on size
150g milk
150g cream (recipe didn't specify but I used thickened cream)
150g cold water

1. Sprinkle gelatine powder over water (from part A) in a small saucepan; let stand 5 minutes to soften. Add sugar and place over low flame and heat until gelatine powder and sugar dissolves.
2. Puree the strawberries in a blender until smooth (you'd also want sieve it to remove the seeds) and then mix with all the other ingredients in part B.
3. Stir the gelatine mixture into the strawberry mixture. Pour into moulds and chill for at least two hours before inverting onto a plate to serve.

Note: This panna cotta is a lot firmer than what I'd imagined panna cotta to be, so I'm not sure if it's technically a panna cotta- it's sort of like a firm milk jelly. BUT it still tastes delicious =)

Wednesday, September 8, 2010

[Perhaps] My Favourite cake

38 Comments


My parents came home on Sunday to find my hands in a rather unusual place- in the sink. My mother rolled her eyes- "What have you been up to this time??" I thought it would have been obvious from the warm scent of butter and sugar wafting in the air. Or maybe it was supposed to be a rhetorical question. "Washing the dishes of course!" I answered cheekily.

When my parents leave me at home, it can almost be expected that I will bake something. When else would I find the time to do whatever I want in the kitchen, without being told to move stuff out of the way, or to neaten things up and to remind me to put things back?? But this Sunday, I was supposedly supposed to study for my english exam on Monday which is why my parents were somewhat surprised that I was baking rather than studying.

They shouldn't have been- I always bake when I have exams. You would've have thought they'd have figured out by now!


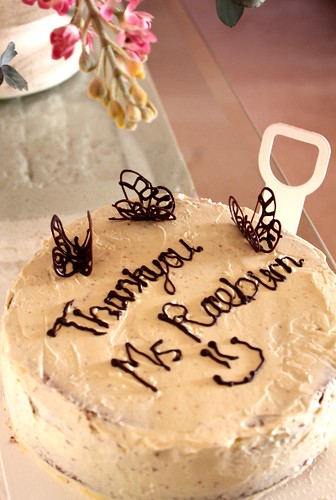
Ever since I started baking, every event has turned into an excuse to bake, and so my reason for baking this time, was father's day. Baking for my father isn't too difficult- he never has too much to say about anything I bake other than the usual few one 'Why didn't you put raisins in??'

Natuarally, anything studded with raisins, whether it be a cake or bread would please him fine- but of course, I didn't want anything as straight forward and simple as that. I wanted something with a little more of a 'wow' factor, not necessarily something difficult or decorative, but something which tasted extra good- which brought my mind back to this sour cream pound cake recipe I hadn't made for at least two years.


If you say pound cake, I immediately think of the Sara Lee frozen pound cakes. My parents would occasionally take us to the Sara Lee factory outlet when I was young, to buy a couple of pound cakes. Although we'd occasionaly spy these cakes at the supermarkets, they were never in the range of flavours they had here- chocolate, strawberry, vanilla, coffee and even honeydew melon!! It's been ages since I last had one, but I can still remember quite clearly, the soft texture of the cake and the taste of each of the flavours. I ate them at any time of the day, even for breakfast, and particularly loved eating them straight out of the freezer, when they were hard and freezing cold.

It was these memories that had first inspired me to try making pound cake, a couple of years ago, but my internet searched resulted in recipes with an awfully high amount of butter which I just couldn't bring myself to using. I settled for a simple sour cream pound cake in a cookbook on my shelf, knowing that it wasn't anything like it.

Not surprisingly it didn't actually turn out like the Sara Lee pound cakes either. But we were absolutely astounded at the cake- it was deliciously smooth, soft and had a rich buttery taste! We easily gulped it down within a day and it was one of the few recipes I'd actually made more than once! Back then, I didn't have a loaf tin, and used an old foil tin which my mother had washed out, before upgrading to a new foil tin (from the supermarket) for my second cake and eventually ended up buying a loaf tin- just for this cake.


I don't know how this recipe got forgotten over the last years, but when I got it out again to try on Sunday, it was recieved with an even better response from my family. From the first bite, we could tell the recipe was a keeper (my family had completely forgotten that I'd ever made this cake before)and I immediately got requests to make it again. I think it goes without saying that the cake was gone within minutes, despite only just having finished dinner. And so I made it again, infact, I doubled the recipe to make two cakes yesterday when I came home after school. And because we loved this cake so much, when I realised we were out of sugar yesterday, we didn't mind walking out to the supermarket just to buy sugar for it.

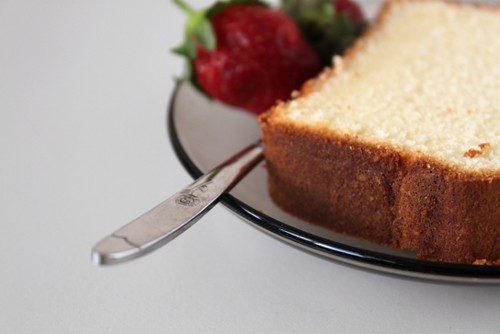
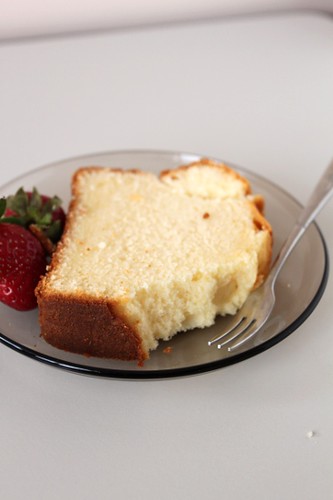
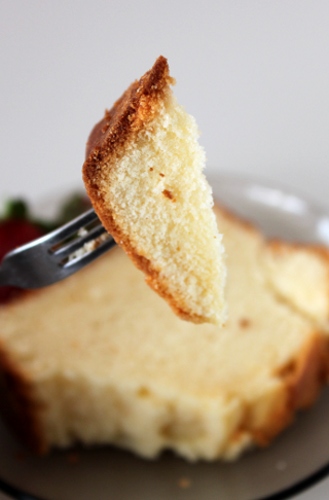
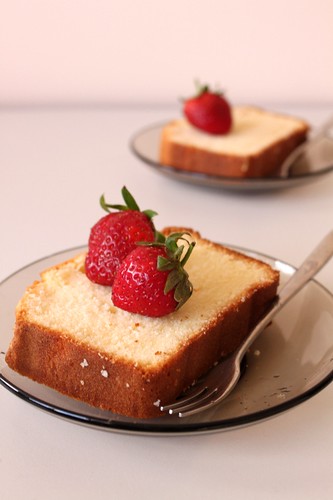
The texture of this cake is incredible. It's so amazingly light and soft that it's comparable to sponge cake only not as fluffy and still retains its slightly firm texture. It isn't dry, but a little moist from the yoghurt, but not too moist that it doesn't seem like pound cake- it sits perfectly in the middle of dry and moist. Just the way I like it.

And the taste is just as good- it's rich and buttery, but not overwhelmingly so. The taste isn't anything special, but rather accentuates the delicious simple flavours of butter and vanilla. You could always change the flavours, but I think the simple vanilla flavour works well, putting a little more emphasis on the texture of the cake, whilst tasting delicious at the same time. I used yoghurt this time because that was what we had in the fridge but they both work the same. The sourness does not come through unless you concentrate really hard on tasting it- no one in my family noticed I used yoghurt! But the slight sour taste does give the taste that little something, making the flavour taste just that little bit better!

This is the type of cake which is so addictive, you just know you could eat the whole thing, by yourself, all in one go. They type which you'd almost do anything just to have another slice. I don't know why the cake turned out to be a little different to my previous tries, especially in terms of texture, but I have a feeling that if I froze this one, it would be very similar to the vanilla Sara Lee pound cake- but the cake doesn't last long enough for me to even try freezing it!

Now, back to Father's Day- my parents had came home early on Sunday, which was why I was still washing up, rather than innocently slaving my way through my english book. My dad wanted to mow the lawn before it got dark, leaving plenty of time for the cake to cool, but left me with the job of fending off hungry sisters and mothers from the cake =) By the time we got around to eating the cake, it was past dinner. And my dad's first reaction??

"Why didn't you put raisins into the cake??"


Sour Cream/ Yoghurt Pound Cake

from the Better Homes and Gardens Cookbook

½ cup (113g) butter (I reduced it to 90g)
1 cup sugar (I decreased it by a bit)
3 eggs
½ cup sour
cream/yoghurt
1 ½ cups plain flour
¼ teaspoon baking powder
1/8
teaspoon baking soda
½ teaspoon vanilla extract

1. Allow butter, eggs and sour cream (or yoghurt) to stand at room temperature for 30 minutes. Meanwhile, grease and lightly flour a 8x4x2 inch or 9x5x3 inch loaf pan; set aside. In a medium bowl, stir together flour, baking powder and baking soda; set aside
2. In a mixing bowl, beat butter with an electric miser on medium to high speed for 30 secs. Gradually add sugar, beating about 10 minutes or until very light and fluffy. Beat in vanilla. Add eggs one at a time, beating 1 minute after each addition and scraping bowl frequently. (EDIT: beat eggs only until just incorporated- if you overbeat, the cake will not turn out light). Alternately add flour mixture and sour cream (or yoghurt) to butter mixture, beating on low to medium speed after each addition until well combined (EDIT you want to beat as little as you can to keep the batter light, so beat only until just combined and don't add the cream/flour in too many additions). Pour batter into the prepared pan.
3. Bake in a 325oF (160oC) oven for 60 to 75 minutes, or until a wooden toothpick inserted near the centre comes out clean. Cool in a wire rack for 10 minutes. Remove from pan; cool.


Also note that the cake tastes better when cooled =)

Saturday, September 4, 2010

Butter Chicken

19 Comments

How much butter is actually in butter chicken??

I'd always just assumed that there was a lot, after all, there must be a reason why they name it butter chicken! I mean, butter cakes have a lot of butter in them. Butter cookies also use plenty of butter. And buttercream is made of butter!

Funnily enough, it didn't really occur to me until after I made this butter chicken, that there was no butter in this recipe at all! (this can be explained- it's actually replaced with cream!) I chose this recipe because there were only two spices I needed to buy, but only found out that I didn't have half the ingredients after I decided to make this. And I did make a huge mess in the kitchen. But it was all worth it because it tasted really delicious, with my sister accusing me of making her fat afterwards ;)


Butter Chicken
Recipe from Almost Bourdain

140 g (1/2 cup) Greek-style yoghurt
3 cm piece ginger, peeled, finely grated
2 cloves garlic, crushed
2 tbsp garam masala
1 lemon, juiced
2 tbsp olive oil, plus extra, to grease
1/4 cup roughly chopped coriander, plus extra leaves, to serve
800 g chicken thigh fillets, cut into 3 cm-wide strips
2 tbsp ghee (clarified butter)
2 onions , thinly sliced
1 tsp ground turmeric
1 1/2 tbsp tomato paste
2 long red chillies, seeded, finely chopped
260 g (1 cup) passata (sieved pureed tomatoes)
300 ml pouring cream
1 bunch mint, leaves picked, finely chopped
Basmati rice and pappadams, to serve

1.Combine yoghurt, ginger, garlic, 1 tbsp garam masala, lemon juice, oil and half the coriander in a large bowl, then season with salt and pepper. Add chicken and toss to coat. Cover with plastic wrap and refrigerate for 3 hours.
2.Preheat a lightly greased barbecue or chargrill pan over medium-high heat. Remove chicken from marinade and cook, in 2 batches, turning for 6 minutes or until almost cooked through.
3.Heat ghee in a large saucepan over medium heat, add onions, turmeric, tomato paste, chillies and remaining garam masala, and cook, stirring, for 5 minutes or until onions are soft. Add passata and cook for 5 minutes or until thickened slightly. Reduce heat to low, add cream, mint and remaining coriander, and cook, stirring, for 2 minutes. Add chicken and simmer, stirring occasionally, for 15 minutes or until sauce thickens. Scatter with extra coriander and serve with rice and pappadams.
Related Posts with Thumbnails