Sunday, July 25, 2010

Ambi's Indian Restaurant

18 Comments
Samosas- $5 for two

Having never been to an Indian restaurant and having a group of (awesome) Sri Lankan friends, it isn't hard to guess where I'd go to if I ever needed a restaurant suggestion. Or better still, someone to take me to one =] Since I'd taken my friend to an Asian restaurant (sushi train) last year, she decided to take me to try out Indian food, which is why our small group end up in front of Ambi's Indian Restaurant on a Monday night. Even if it's three quarters of a year after I took her out ;P We had pondered about whether or not to make a booking, but decided against it since there was another Indian eatery down the road if it was full. We needn't have worried though- we were the only ones there when we walked in!


We take a seat right in front of the display of Indian sweets, and slowly ponder over the menu. The menu is extensive and even my friends don't know a lot of the food on the menu. When the waiter arrives, ready to take our order, we're still slowly trying to decipher the menu and attempting to choose something. The waiter suggests we choose our drinks, and copying my friend, I order a mango lassi (we all end up ordering one =])

The mango lassi is sweet and surprisingly thick. Given that I love mangoes, and it's been too long since I've had one (or even anything mango flavoured), I loved it. Both the sweet and the cold also went well to cool the spiciness of the curries too!

Saffron rice

The rice is ordered separately to the curries, something which I'm unused to, and we decide to order a saffron rice just to try it out. The saffron rice was...well, laughable. Despite never having saffron rice before, I do know that saffron is yellow, and I was pretty sure that saffron rice is meant completely yellow, and not just a splodge of yellow rice in a dish of plain rice. Nevertheless, it was fun to try, even if it mightn't have been worth the extra dollar it costed. Funnily enough, I also found bits and pieces of yellow rice in the plain rice, along with other funny spices which were in there in a way that made me uncertain whether it's there deliberately or not.....

Papdi Chaat $6.00

My friend orders the papdi chaat, one of her favourites. The thin, crispy wafer, made from the same deep fried pastry as the samosa pastry, covered in yoghurty sauce looks delicious. And, as my friend remarks, looks like an Indian version of nachos =] Although it appears on the menu as an appetiser, this serving does well to fill her up for the night. But then again, she's the one who was too full after eating two pieces of terriyaki chicken sushi when we took her to the sushi train...

Butter Chicken (Murg Makhani) $14.50

We order butter chicken, simply because it's a dish we're all familiar with- even me. Despite never having had butter chicken at a proper Indian restaurant I've tried authentic butter chicken a few times thanks to my friends, or rather their mothers at parties and get togethers. The butter chicken does not dissappoint, and the rich and flavourful sauce has us finishing this in no time. I find the chicken surprisingly tender, perhaps because they use chicken thigh instead of breast (I think) which makes me love it even more!


Chicken Tikka Masala $14.50

The menu states that we can choose how hot we would like the curries we order, so we ask for both curries to be mild because I can't stand hot very much. The Chicken Tikka Masala however, can only be medium-mild because the sauce base itself is mild from the spices used. Despite it being a slightly common Indian curry, I'd never heard of it before and my friend explains that it's similar to tandoori chicken- without the bones. Which sounds all good to me, only I'm a bit scared of the spiciness (I really don't take hot food well). The curry is quite different to the butter chicken- it's not as creamy, and has a strong tomato flavour. It is extremely flavourful, and although I have no idea what the spices used in it were, I can tell they used a lot in it :P As for the spiciness, I'm surprised that it isn't too spicy and eventhough my mouth slowly got hotter and hotter through the meal, it was bearable enough not to stop me from continuing to eat it! I personally preferred the butter chicken better, perhaps because of the spiciness, but I loved this too.

Raita $2

Our order for raita seemed to have dissappeared and it isn't before we've gotten through half our meal that we decided to enquire about it. Now I usually don't like mint, but I found this minty yoghurt sauce a nice accompaniment to the spicy curries.

It's funny how the curries were surprisingly filling, leaving no one with an appetite for dessert, so we finished and paid for the bill- after taking 15 minutes to figure out how to split the amount with everyone's $20 notes =P We ended up giving whatever couldn't be split as tips- which I think wasn't a bad idea as I thought both the food and service were pretty good =]

Ambi's Indian Restaurant on Urbanspoon

Tuesday, July 13, 2010

Testing out my oven.....

26 Comments

An electric oven was never high on my list of things I wanted- why would I want an oven, when I had a perfectly functioning gas one at home? Sure, my oven often refuses to start (and usually in the most convinient times!), but it's always managed to create beautifully baked goods.

Getting an electric oven was my mum's idea because a sometimes, the oven is a little too big to bake small things which require short baking times. But a simple electric oven was not what she had in mind- she wanted an electric oven with a rotisserie function. A chicken on a stick revolving around in an oven? Now that sounds like a whole heap of fun! So when we bought a new, small electric oven two days ago, I was extremely excited. So excited that despite the fact that it was almost bedtime, I wanted to plug it in and bake a cake straight away. My mum wouldn’t let me =[

We ended up ‘testing’ our new oven by baking garlic bread the next morning, forgetting to read the manual (because we were all so excited) and skipped the ‘do this before using you oven’ step until the oven started smelling like stinky plastic……Woops!


But since you can’t really test an oven by baking garlic bread, I tested it again. For lunch! I chose a simple quiche recipe to also try out my new tart pan- I’ve been wanting one for a while now (they make pretty tarts!) The tart pan wasn’t very deep so I had to halve the recipe I usually use. It also had a removable base so when I was transferring the pastry (in the tin) with one hand under the tin, it fell out and fell on the floor- I guess my hand span is less than 18cm then!

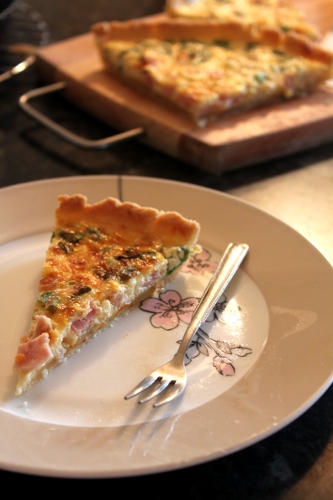
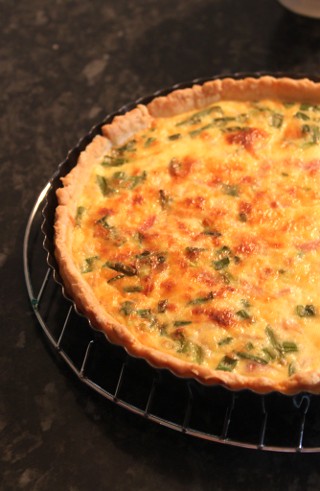
The tart itself didn’t turn out too bad and the tart pan made it look so much prettier than when I bake it in my glass dish. But it was really thin, and definitely not filling enough for three of us (I could easily eat the whole thing).

But the oven was so different to my gas oven! I think the lack of flame makes it look not as hot as the gas oven, but I have a strange feeling that the actual temperature in the oven is lower than the temperature on the dial because the tart took longer than I expected it to take. Not being able to turn on a light to look inside was also uncomfortable (and I couldn't even open the door =[ )and I found it really weird when I opened the door and didn’t receive a huge blast of hot air blowing at my face. I still like my gas oven better, but having a smaller electric one means that I don’t have to feel guilty about using the oven for 5 minutes. Which means I can now bake even more!!

And just incase I didn't test the oven properly (and because I can't have all the fun), my mum baked chicken wings for dinner ;)


Ham and spring onion quiche/tart
adapted from The Better Homes and Garden Cookbook

Pastry:
1 ¼ cup plain flour
1 Tbs sugar
¼ tsp salt
¼ cup cooking oil
3 Tbs milk (I needed a lot more)

Filling
2 beaten eggs
¾ cup milk
¼ cup slices green onions
1/8 tsp salt
1/8 tsp black pepper
dash ground nutmeg
1/2 cup chopped cooked ham (or chicken or crabmeat)
¾ cup Swiss, Cheddar, Monterey Jack or Havarti cheese
½ tablespoon plain flour

1.In a medium bowl, stir together flour, sugar and salt. Add oil and milk all at once to the flour mixture. Stir lightly with a fork. Form into a ball. Press dough firmly onto bottom and up sides of a 23cm pie plate or tart pan. Cover in two layers of foil and bake in 230oC oven for 8 min. Remove foil and bake for 4-5 min until pastry is set and dry. Remove from oven. Reduce oven temp to 180oC
2.Meanwhile in a medium bowl, stir together eggs, milk, green onions, salt, pepper, nutmeg. Stir in ham. In a small bowl, toss together the cheese and the flour. Add to egg mixture; mix well
3.Pour egg mixture into a hot, baked pastry shell. Bake in the 180 oven for ~30 minutes or until knife inserted near centre comes out clean. Let stand 10 min before serving.

Monday, July 5, 2010

Coconut roll buns

20 Comments
We’ve come to another school holiday again- another one of these short two week holidays which pass so quickly that by the end of it no one really remembers doing anything important. This holiday, however, is supposed to be slightly different as we have trials coming up shortly after we return to school- I think there’s an expectation that we spend most of it studying *shiver*. Infact, yesterday, our principal even advised us to balance our study with 3 or 4 days of relaxation (or no studying)

I’ll be lucky if I even get 2 days of studying done.

Which will inevitably end up with me staying at home on the last day of the holidays trying to finish whatever homework was set, wishing that I’d done it before so that I wouldn’t have to stay up til midnight doing it. It happens every time =]


It’s funny how it only seems like a couple of weeks ago that we started off this term. I still remember sitting in front of the computer, and writing out my Cocktail Buns post after school a couple of months ago, excited about all the recipes I’d try during the holidays and all the activities I’d planned to do. And now, I’m sitting here doing almost the same thing .

Time plays funny tricks on me though- whilst it has flown by incredibly quickly, at times it passes painstakingly slowly. Take yesterday for instance, when I was sitting in my physics class, slowly counting the last 7 minutes until I could go home. Those 7 minutes felt so long! Not that I should be complaining- I got to leave school 2 hours earlier than everyone else =]


But then again, time plays funny tricks on me all the time- in the kitchen, twenty minutes passes in a flash when I'm whipping up a cake batter, but seems to take forever whilst waiting for a cake to cool. Which is why I love baking things which can be eaten (almost) straight from the oven- even if they burn my tongue =] I guess that’s one of the reasons I love baking bread.

There’s still so much for me to learn when it comes to bread baking, (and baking in general) so it was about time I tried something new with bread. Not simply a new recipe, but a new technique, known as the water roux method. Instead of throwing all the ingredients together, this requires the flour to be cooked in water to form a paste to be added to the dough. Whilst this doesn’t sound too exciting, it seemed more fun than the normal method, and I’d read that it produces a very soft and fluffy bun too!

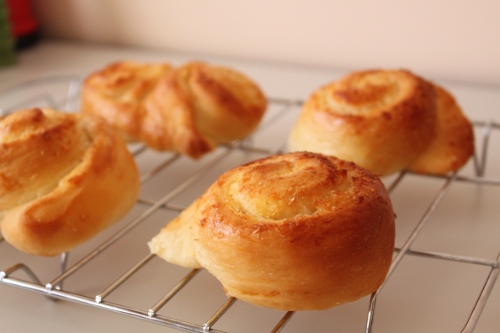
IMG_1283

I love the versatility of Asian bread dough- it’s amazing how one simple bread dough can be made into a billion different types of buns, each so different from one another. Infact, so different that I once thought that each type of bun used a different dough altogether! I was shocked when I first bought a book on Asian breads, to find that out of the hundred or so recipes in there, that they all used the same bread dough recipe! For my first attempt at this dough, I thought I’d keep it simple and make my favourite- coconut roll buns.

When we first saw these buns at an Asian bakery, my mum told me of how she used to love to eat them when she was young. The coconut buns sold in bakeries in Hong Kong were much larger (and cheaper) than these ones in Sydney and unravelling such a large bun was not only fun but extremely satisfying. Unfortunately, coconut buns of such size are nowhere to be found in Sydney but a smaller, ‘standard’ sized version can be found in most Hong Kong style bakeries, as all the breads are usually the same size. The filling is much like that of a cocktail bun, only less buttery but tastes just as good. I’ve also found that they taste best after a little heating up in the toaster- drying up the coconut a little bit and giving the bun a little crunchiness on the crust!

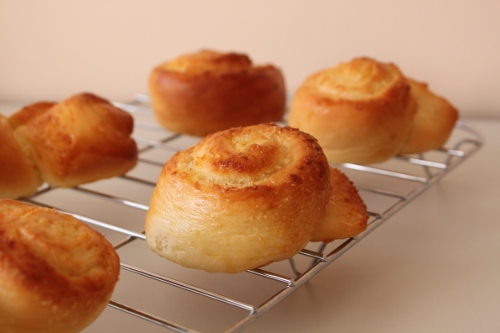
IMG_1295

Since I couldn’t find any large coconut roll buns here, I decided to make jumbo sized buns with this bread dough. The dough was not too difficult to make, although heating the roux up to 65 degrees was a little more difficult that I thought it’d be because it’s hard to mix with a spoon, hold a thermometer and read it at the same time. And then I accidentally turned off the heat when it was 60 degrees so I had to start again (I don’t actually think it would have made a difference though). The dough turned out too wet and I ended up hand kneading it for half the time, to get the right stickiness (which took forever….)

In the end, I forgot about making huge coconut buns, which may have been easier to shape than these ones because I rolled the dough out too big so I had to flatter them with my palm, which is why the ends stick out (woops =P)

IMG_1297

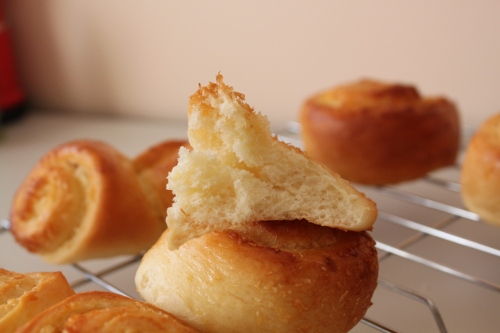
But that's okay because when I took these out of them oven, they didn't look too bad- and they smelt delicious! (but then again anything with coconut in it smells delicious) And then, when we pulled apart these buns, still hot (of course), we were pleasantly surprised to find that not only did they taste just like the coconut buns from Asian bakeries, they tasted even better because they were hot soft and fluffy too! They were definitely the softest buns I've ever made, and are seriously addictive- we ate almost half the batch straight away (I only made 8 though) despite the fact that dinner was almost ready......

IMG_1298


Hong Kong Style Coconut Roll
Recipe from Hong Kong Breads by Yau Yung Ling
Dough recipe from Corner Cafe

Ingredients
Dough
375g bread flour
100g plain flour
35g milk powder
75g caster sugar
3/4 teaspoon salt
1 sachet (7g or 2 1/2 tsp) instant dry yeast
1 egg, lightly beaten
150ml (approx.) lukewarm water, adjust as necessary
40g butter, cubed

Roux

25g (just under 2 tbsp) bread flour
125ml (1/2 cup) water

Filling
84g coconut shreds
2g melted
butter
56g sugar
¼ egg
Some vanilla essence (I used a drop)

Glaze
Some plum jam/butter

1. To make the roux, mix together the flour and the water and heat over medium heat until it reaches 65 degrees celcius. Turn the heat off and leave to cool until lukewarm
2. To make the dough, mix together all the dry ingredients and make a well in the middle of the mixture. Add the egg and the water roux and mix. Add the water until a soft dough it formed and then knead the dough until it is smooth and elastic (~10 min) Knead in the butter until it is incorporated. If making it in a breadmachine, put in all the water and dry ingredients and let it knead for a while. Add the water roux and let it knead, adding water or flour as necessary. Add the butter when the dough becomes smooth (~10minutes). For more detailed instructions, go to Corner Cafe
3. Place the dough in a warm spot to rise until double its size (~1 hour)
4. To make the filling, mix all ingredients (except egg) together
5. Divide the dough into 4 equal portions and roll one portion into a rectangle. You can roll the rectangle into as long as you want but don’t let the width exceed 15cm (or else it will tuen out the wrong size). Brush some egg and spread a quater of he filling on top, roll the dough up like a swiss roll and cut into four pieces (like pinwheels, I guess). If you accidentally rolled it too wide, you can try flattening the dough with your palm- just press down! Repeat with the other 3 portions of dough. You should end up with 16 buns
6. Place on a baking tray and cover with cling wrap. Let rise in a warm place for about 1 hour or until double in size (mine took about 2.5 hours….)
7. Brush the top with egg wash and bake at 180oC for 10 minutes or until golden brown. Brush the hot buns with jam or butter immediately after baking.

Related Posts with Thumbnails