Monday, June 28, 2010

Myung Ga BBQ

14 Comments
I have not been taking the cold weather well. I'm terribly sensitive to the cold, and it seems that no matter how many layers of clothing I wear, my body just does not seem to warm up. And even when my body is warm, my feet, fingers and kneecaps still remain so cold that you could probably freeze water on them =] It probably does not help that our house is particularly freezing and a heater is something that we never use, so I try to warm myself up with food. My parents suggested we try out Ginseng Chicken Soup at a Korean restaurant, since ginseng has a warming effect (and I've never had it before), which is how we end up at Mung Ga BBQ- our favourite Korean restaurant (out of the 3 that we've been to =])

Walking in on a cold winter's night, we are greeted by the warmth- not only from the heating but also from the few barbecues which have started. Although the barbecues look delicious, they are quite pricey, and to me, not quite as appealing as the cooked dishes. There are a few others already dining in there, and we spy a lot of stone pots on the tables. There are plenty of 'chairless' tables (the ones where you sit on a cushion on the floor), but we choose the last table available, not wanting to go through pins and needles again. I notice the glossy wooden tables with the their cracked surfaces (a result of the heat from plates), match the brown, wood coloured walls. It's the lack of decor, and these little imperfections which make this restaurant particularly comforting, just like the smell of their food. There's nothing extravagant, just simple furniture, and the small restaraunt makes it quiet and feels rather like somone's home.


My dad notes that it looks similar to restaurants in Korea. I wouldn't know- I've never been there. I suspect, however, that the food is quite traditional, since the majority of diners are Korean and the menu does not look to be intended for one without a knowledge of Korean food (like... us). So it wasn't much of a surprise that we could hardly gather what most of the items on the menu was. Not wanting to venture outside, into the cold to see the picture of the food on the outside window (which was what my mum did last time), we ended up picking the exact same dishes as we did last time- not that we minded.

Bean Sprouts

The complimentary appetisers arrive a short while later, along with cute little bowls, a pair of disposable chopsticks each and a spoon, with it's head wrapped in a cute little paper pouch. They are quite generous with the appetisers, which I find to be very delicious (and one of my favourite parts of Korean food) and I'm surprised to see, later, that they give the same amount per table, even if there's only one person (eating all the appetisers would be quite filling for one person)! I suspect, however, that these appetizers are 'refillable' (you can ask for more).
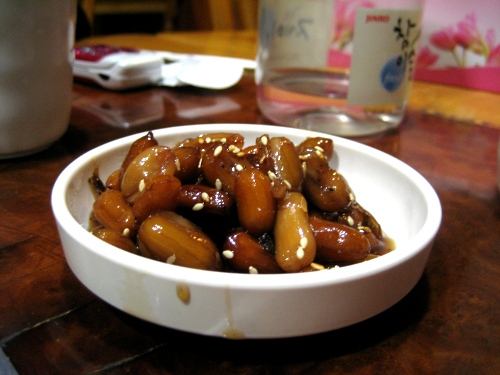
Nuts

Soaked in a sweet sauce, with a slight taste of honey, these nuts are surprisingly soft and addictive. What these nuts actually are still remain a mystery to me, but they are no doubt my favourite out of all these appetisers and I'd happily snack on these all day.

Kimchi
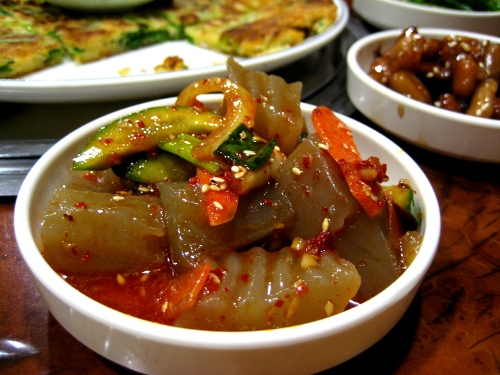
Jelly
Covered in a kimchi-like sauce, these very soft jellies are a bit spicy, but the coldness cancels out the spiciness =] As with the nuts, I have no idea what this actually is......
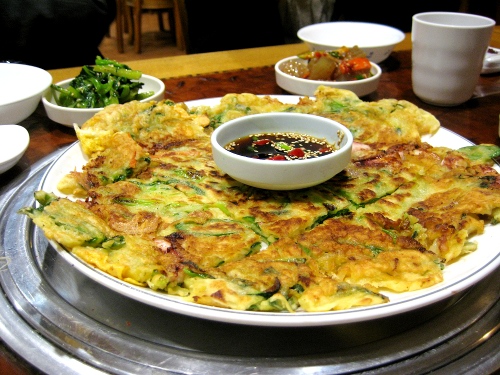
$13 Seafood Pancake

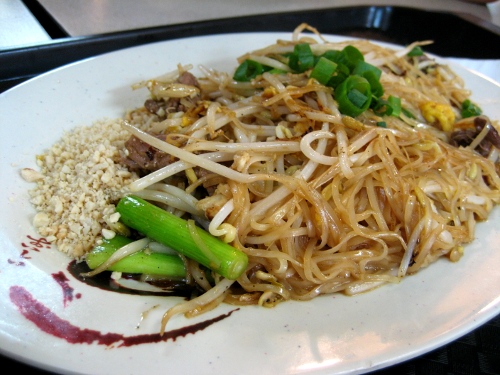
The seafood pancake arrives just as the last appetisers is offloaded, leaving us with no time to savour each of the appetisers slowly. The seafood pancake is just as we remembered it- big and yummy! The pancake is deliciously light and fluffy, with the exterior slightly crispy from the shallow frying. We start with the edges, which we find more appealing than the centre pieces as the edges are crispier. It's loaded with spring onions, but there isn't a lot of seafood in there, just pieces of calamari here and there. We don't really mind notice because it tastes delicious!

$13 Stone Pot Bibimbap


The pot arrives and is so hot it makes crackling sounds. It looks awesomely colourful with the selection of vegetables and mushrooms cut into thin strips and arranged on a layer of rice. The half cooked egg sitting on top is quickly cooked as we mix it into the hot rice below, giving it a sort of soft, scrambled egg texture. I love the interesting texture of this dish, as each ingredient has a unique texture of its own- whether it's the soft onions or the chewy shitake mushrooms. But my favourite texture is that of the crispy rice, which is created from the direct contact of the rice with the hot stone. The is the reason we order the 'stone pot bibimbap' over the 'bibimbap', eventhough it costs a dollar more =] And it looks cooler too!

$10 Beef Bone Soup

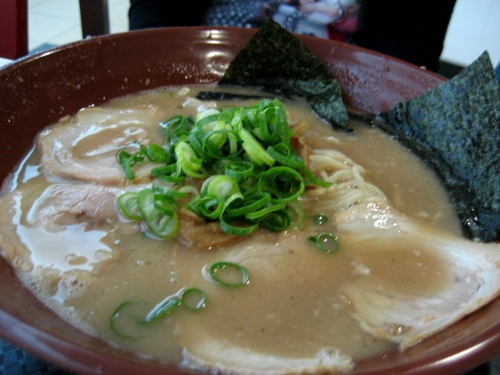
The bone soup arrives, and is so hot that it's still bubbling like a gentle spa, with
a huge puff of steam around it. We ask for both of the two (free) bowls of rice which accompany the soup, to save us having to ask again if we needed to, but we have a hard time finishing it, because we only eat a small amount of rice- and we already had rice in the bibimbap. We are also puzzled as to why we get two bowls of rice, as they clearly don't both fit into the soup.......
The soup is deliciously flavourful, with a strong beef flavour.The strands of glass noodle within the soup along with the pieces of beef are deliciously soft and slippery, although scooping them out of the pot proved to be a difficult task.


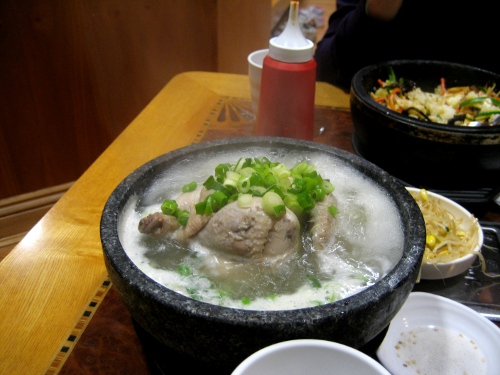
$19 Ginseng Chicken Soup

If the bone soup looked like a gentle spa bubbling away, then the Ginseng chicken soup looked like a pot of soup, boiling away on the biggest flame on a stovetop. It was really really hot! The chicken itself looks like a simple, boiled piece of chicken (and a small one too!) swimming in a clear soup but pulling it apart reveals much more. There's a small ball of glutinous rice, not yet soft, although soaking it in the soup for a minute or so softens it enough to eat (it has a really interesting texture!). We also find a couple of red dates, which are apparently healthy, and lastly, two small pieces of ginseng. My dad gives it the thumbs up, complimenting it for its a nice ginseng taste, which is strong enough to be tasted, yet not too strong that it's overpowering (and apparently, it tastes like the ones he's had in Korea). I, on the other hand, am completely lost as to what ginseng tastes like, with no memories of having it, so to me, it tastes like a simple chicken soup. I take a few bites of the ginseng, which looks rather like a knob of ginger but tastes nothing like it. The ginseng isn't too strong, but I can taste a slight bitterness, and a unique taste which I have since forgotten. I love this soup though- both for its taste and the novelty of pulling a chicken apart, searching for the ginseng and then eating it out of a stone pot.


Myung Ga BBQ restaurant
120 Rowe St
Eastwood NSW 2122
9874 3383

Myung-ga BBQ on Urbanspoon

Monday, June 21, 2010

Chocolate Mud Cake

20 Comments
Do you know how your love of food/cooking/baking started? I do. It all started with cakes. From the moment I realised that it was possible to make cakes from scratch at home, I had to make one. It wasn’t easy, despite the simple (but not very reliable) recipe I used and it took at least 4 tries to get it right. But after the first time I got it right, I was hooked. I fell in love with the feeling of creaming butter, whipping eggs, folding the batter and then scraping it all out of the bowl and into the tins. And I loved the anticipation whilst watching to see if the cake would rise (and more importantly how much it would rise) and the satisfaction of taking a beautiful cake straight out of the oven to devour straight away. I’ll take any opportunity to bake a cake- which is why I did not hesitate to offer to bake a cake for my friend's surprise party.

The fact that our group of friends only decided we wanted a cake two days before my friend’s birthday (because us teenagers are unorganised like that), made it difficult to make anything really special because I like to have a long ‘thinking time’. So, to keep it sort of simple, I decided on a chocolate mud cake, since everyone loves chocolate- so no matter how badly the baking would go, it couldn’t really taste too bad. I also decided to add bit of chocolate frosting and ganache over the top to make the cake more like of a birthday cake without being too extravagant or time consuming. Considering the number of times I’ve made chocolate cake before, there wasn’t too much that could go wrong………

You can probably guess it didn’t quite go as planned.

IMG_2303

Even before the baking started, I ran into my first ‘problem’- the budget. I didn’t realise that chocolate would cost so much! I ended up buying Cadbury (~$3.50) only to realise later that not only do normal bars of chocolate cost a lot less than ‘cooking chocolate’, there’s almost always a brand of chocolate for half price every week too! So, as far as I’m concerned ‘cooking chocolate’ is just a marketing trick to get us consumers to pay more for the same bar of chocolate =[

The baking, however, started off perfectly. The recipe was simple- just some melting of chocolate and butter, then some mixing and then into the oven it went. I did go a little overboard with the mixing (because it’s so fun!) so the cake turned out lighter than it should have been, and therefore not very mud cake-y, but I like light cakes anyway =] I don’t have two pans of the same size in my household, so I ended up baking then in two slightly different tins. The cakes turned out wonderful despite the slightly domed shape (I increased the temperature a bit). They smelt delicious and I had an urge to just peel of the crispy edges like I always do but somehow managed to refrain. It was so hard not knowing how the cake would taste! With the baking only taking me about an hour, I had things all under control- how long could the icing possibly take????

Chocolate Mud Cake

I left the cake to cool for more than an hour, which was more than enough, in this cool weather. Once I was satisfied that the cake was cool enough, I started with the frosting, which was a simple truffle ganache frosting- just chocolate, sugar, cream and butter. When that was done, I started to cut trim the cakes. Since one was larger than the other, I wanted to cut the larger one until it was the same size as the smaller one- sounds simple enough right? It was only then that I realised I’d never trimmed any cake before, and as I made my way around the cake with a knife, bits and pieces just fell off, leaving me with a smaller, wonky sized cake!

From there on it went downhill- I tried to cut the top one too make it look like the second one, and when that didn’t work I tried cutting them both together- but the cake just fell off in huge pieces! The originally 23cm cake, eventually turned into a smaller than 20cm cake, and I ended up having to stick the cake back together with chocolate……and ended up with a terrible chocolatey mess in my kitchen too! There were cake crumbs and chocolate everywhere! And then when I went on to frost the cake, I realised that I didn’t have nearly enough frosting- clearly 200mL of cream was not enough to frost two layers of 20cm cake! So I improvised a chocolate butter cream with melted chocolate, butter and icing sugar only to run out of chocolate (luckily I still had some not very good quality chocolate in my pantry) and to have the chocolate turn into specks of chocolate in the buttercream.

By the time I made the ganache to pour over the cake, I’d spent too much time and used way too much equipment, to bother with making it properly. I just placed it in the microwave to heat- hence the lack of glossiness and the lumps of chocolate everywhere. It was a little too runny, and the icing ran all over the counter top but at least I sort of got the dripping pattern I was hoping for…….sort of. I attempted to make cake balls out of the cake scraps, mixing them with the left over runny ganache, but realised I didn’t have enough ganache so I tried piping my friend’s name with the mixture and when that turned out horrible I tried piping a thin line on the bottom of the cake, despite the face that I only had enough to go around a quarter of the cake. So if you were wondering what that dark brown thing at the bottom of the cake is, now you know =]

IMG_2293

So, more than two bars of chocolate, two blocks of butter (no one needed to know that…), a tub of cream and a two sink-fuls of baking equipment later, I finally had my cake. Now all that was left to do was to put it in the cardboard cake box and take it to school……. and ask the canteen ladies whether we could borrow their fridge for half a day, and try to sneak the cake into a room without the birthday girl seeing it =] The surprise party was a success, and we had a wonderful time, even if it took half of lunch to get everything prepared. Because of certain laws which ban students from taking knives to school, we had to cut the cake with a plastic knife- which just does not work, no matter how good at cutting cakes you are! The cake however, tasted surprisingly good- I got great reviews from everyone who tasted it (although no one's ever really going to tell you that your cake tastes bad) and it was definitely one of the best chocolate cake recipes I've tried- I'd definitely use it again! I'd probably halve the recipe next time- despite our very large group of friends, we found it difficult to finish it all!

IMG_2301


Chocolate Mud Cake
Recipe from Exclusively Food

250g chocolate
250g butter (if using unsalted butter, add 1/4 teaspoon salt
with the butter)
1 teaspoon instant coffee granules/powder
188ml (3/4
cup) water
325g (2 cups plus 2 tablespoons) plain flour
30g (1/4 cup
plus 2 teaspoons) cocoa powder
1/2 teaspoon bicarbonate of soda (baking
soda)
550g (2 1/2 cups) caster sugar
4 large eggs
2 tablespoons
(40ml) oil
1 teaspoon (5ml) vanilla extract
125ml (1/2 cup) buttermilk
(I used normal milk)

1. Preheat oven to 160 degrees Celsius (not fan-forced).
2. Grease the side and base of a deep 23cm or 24cm diameter (inside top measurement) round cake pan. Line base and side of the pan with non-stick baking paper, extending the paper a few centimetres above the top rim of the pan.
3. Place 250g chocolate, butter, coffee and water in a large saucepan over low heat, stirring occasionally. When chocolate and butter have melted, remove mixture from heat and allow to cool to lukewarm/room temperature.
4. Sift the flour, cocoa powder and bicarbonate of soda together into a very large bowl.
5. Add the caster sugar to the bowl with the flour mixture, and stir the ingredients together until well combined. For this recipe, we prefer to use a whisk to stir ingredients together.
6. In a medium bowl, place eggs, oil, vanilla and buttermilk.
7. Whisk the wet ingredients together until well combined.
8. Add the egg mixture to the flour mixture and stir until well combined.
9. Add the chocolate mixture to the egg and flour mixture in a three batches, stirring until combined after each addition.
10. Pour mixture into prepared pan.
11. Bake for about 1 hour and 15 minutes (24cm pan) or 1 hour and 30 minutes (23cm pan). Insert a thin-bladed knife or wooden skewer into the centre of the cake to test whether it is cooked through. If the knife/skewer comes out clean or with moist crumbs (not gooey batter) attached, the cake is ready. If not, return the cake to the oven and bake for a further 5-10 minutes before testing again.
12. When cooked through, remove cake from oven, cover with a clean tea towel and allow to cool in the pan.

Sunday, June 13, 2010

Smiling Mouth Cookies 笑口枣

22 Comments
Vondelicious has moved to BerryNutritious.com.au
You can find this post (and more!) over at my new home: 

When I was little, I had terrible teeth. Big, ugly, rabbit teeth. Each tooth had a mind of its own and grew in a different direction to the one next to it- I’m not kidding. It was terrible. I didn’t mind too much- after all, I’d grown up with them. But I tried to hide them as much as possible- like smiling with my mouth closed (at least for photos). Which wasn’t an easy thing. Because when I’m happy, I just can’t seem to close my mouth! Looking back at photos, especially those in year 6, I can’t tell which ones I look worse in- the ones where I’m trying to close my mouth but end up with a funny face or the ones which I just let my teeth stick out. School photos were horrible because the photographer always made us say something like ‘yes’ (actually they still do….) and not only would that be awkward (the way it still is), but I’d have to try to close my mouth lightning fast, which I never managed to do.

I remember a (sort of )conversation with some friends in primary. A girl was pondering over the issue of getting braces- except that, she had pretty much perfect teeth. When I mentioned that I would probably be getting braces soon, she responded with something along the lines of 'If I had teeth like yours, I’d definitely get braces’ (only the real quote had words like 'ugly' somewhere in there too....)=[ I eventually got braces in year 7. They didn't really hurt after the first couple of weeks but my orthodontist told me not to eat chocolate or drink fizzy drinks when I had braces. Being the good girl I am, I actually listened and went off chocolate and fizzy drinks for a whole year (I definitely don't have that self control now)- it was not until I had them off that I realised that no other orthodontist told their clients to do so. But with my braces off, not only could i start eating normally again, I also had straight teeth, meaning that I could finally smile properly- a good happy smile, which I use a lot now =] I never really noticed how much I smiled until someone called me 'smiley'. I sometimes smile instead of saying hello, I smile when I'm embarassed, I smile when I don't know how to respond to something. I even finish sentences with smiley faces, both on my blog posts and in comments ;) My fingers just wander over to the smiley face sign instead of a full stop........ I really love happy things- which is why I love the name of these cookies. And they're delicious too! 'Smiling mouth cookies' is the direct translation from chinese, incase you're wondering about the weird name- because apparently, the split looks like a smile (I don't really see it....) My mum had promised me she'd make these with me, after reading it in one of her chinese cookbooks. But being busy with school work and various other things, this promise got forgotten until one day, after school, a food topic on the chinese radio triggered my memory. Off I went on a rant about how my mother had promised me to cook all these things but we've never gotten around to doing them (to be fair, she keeps a LOT more of her promises than I do), which eventually led to her suggesting we make these cookies right there and then! 
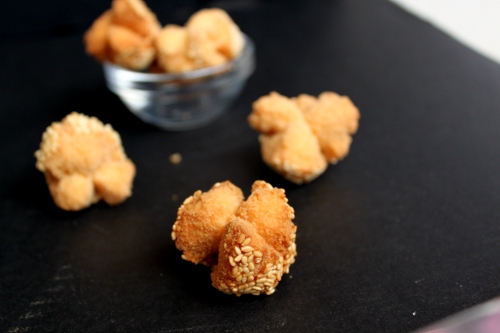
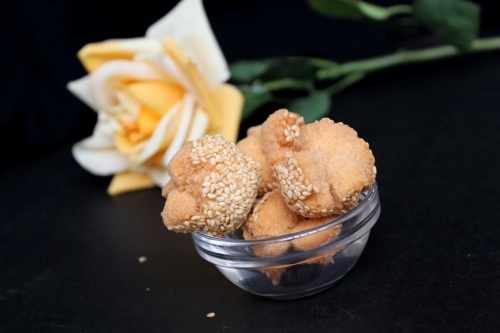
Despite having a load of homwork due, I quickly hurried around the kitchen to grab all the ingredients, before my mum changed her mind. It didn't take too long- my mum read the recipe whilst I measured everything. I did all the mixing and kneading, shoving my mother's helpful hands out of the way every time she tried to grab the dough off my to have a go- yes, we love the hog the fun bits! As luck would have it, we could only find enough seasame seeds in the house to coat three cookies, so we attempted to coat them with coconut, which we realised would not work. So we went back to the pantry, turned the whole thing inside out, and finally find a brand new packet of seasame seeds! *phew* 
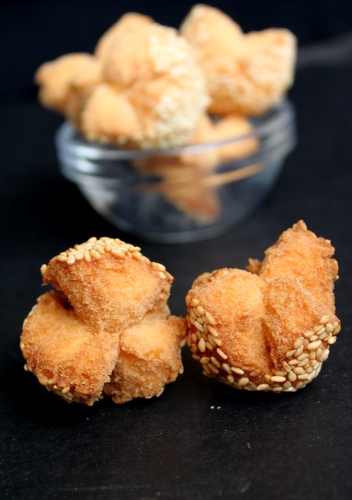
The cookies fry quickly, it only takes about 20 seconds or so for them to float up and another minute to brown but we leave it there for a couple of minutes longer, since the recipe said 6-8 minutes. The coconut cookie browned within the first few seconds, and the coconut got burnt- so don't try these with coconut! They're sweet and crunchy, but the inside is slightly softer and the seasame seeds give it a really nice flavour too. Definitely the type of food to keep me going throughout the night.......to finish all that homework I'd been putting off ;)

Find the recipe on my new site:

http://berrynutritious.com.au 

Thursday, June 10, 2010

Gumshara ramen, 32cm ice cream and other stuff in the city...

14 Comments
We rarely ever travel out to the city- we only really go there once or twice a year. If it isn't for something important, or for a school excursion, then it's most likely for food. Guess why we were here this day?

I'd been itching to start eating from the moment we walked out of Emperor's Garden and so within a few hours, we stopped by Gumshara Ramen- one of the main reasons why we made this trip to the city. I'd been pestering my parents to take me here for a while, after reading the excellent reviews that all Sydney bloggers were giving this- I just had to try it!

IMG_4794
Tonkatsu Ramen $8.50

It was still slightly early (I think), and so the food court isn't too full. Between the four of us, we only ordered two bowls of ramen, saving our stomachs for other food (we also ordered a pad thai from another shop but I forgot to take a picture!). After a short wait, both our bowls of ramen arrive, and I eagerly wait to dig into the thick flavoursome soup. Unfortunately, this excitement is followed by a slight disappointment as we realise that there is barely any steam coming out of the bowls. My first sip confirms this- the soup is warm. Perhaps slighlty warmer than 'warm' but definitely not steaming hot, the way I like all my noodles to be. The soup itself is pretty good- it's tasty and definitely unlike any other ramen soup I've ever tasted, although it wasn't as good as I'd expected it to be.

IMG_4792

Garlic tonkatsu Ramen $10.50

We enjoy the garlic tonkatsu ramen better than the other one, perhaps because of our love for garlic and the fact that the soup is slightly more flavoursome than the other one. Again, it is nowhere near as hot as we'd like it to be, which we find to be the mainthing we have against it. The soup is very very thick, which I don't mind too much (after all, that's what's so special about it!) but which my parents don't really like. Leaving, with very sticky mouths, we head over to Dixon Street food court for part two of our lunch.

IMG_4798
We somehow manage to forget to bring water along, which is why our mouths are stick sticky from the ramen broth. Which is why the sight of sugar cane juice being sold beings much delight (well, to me and my sister anyway.....we love sugarcane juice!) A large cup of freshly squeezed sugar cane juice was the perfect accompaniment to our food. This one had a little squeeze of lime juice in it too, giving it a little something, although I prefer just sugar cane juice.....

IMG_4797

I'd stopped here for lunch once with my friends after wandering around trying to find somewhere to eat. Walking down into this food court, we could immediately smell Asian food- the disctinctive smell of wok. It's awfully stuffy in here though, but I guess it's bearable when you're eating good food! Last time, I'd had a pad thai for $5 (the price was really what lured us)but never really had a chance to savour it because we were running late. It wasn't the best I'd ever had but for $5 it wasn't bad and had a really good 'breath of wok'. This time however, we noticed that the price had increased to $6, which was still pretty good for a pad thai (but it doesn't sound as good as $5 =])

IMG_4796
Pad Thai- $6

The dish arrives and I'm pretty sure it wasn't like this last time- the noodles are awfully thin. Although pad thai noodles are usually thin, they're not this thin- it really doesn't taste right! The pile of sloppy noodles don't look or taste too bad, but are lacking a bit of flavour and the breath of wok wasn't really as good as last time. Nevertheless, it's pretty good value and it isn't too bad although we did wish that we had ordered the hige sizzling dishes that everyone else in the foodcourt had ordered.....

IMG_4936
We then wander over to Darling Harbour, and walk around a bit, taking pictures and feeling much like a tourist despite the fact that I'd been here at least 10 times before.

IMG_4937
We pass The Fudge Shop, and it brings back memories of how I used to just stand there, watching the people make fudge. I couldn't quite remember what fudge tasted like (I'm pretty sure I've only ever had it once, and it was here too!) and decide to buy a slice.

IMG_4935
But there are too many flavours to choose from!

After a couple of minutes of indecision, I settle for a slice of the choc chip fudge. It was soft, super sweet and so delicious! It wasn't cheap though, with the slice costing around $4.50- but I ate it super slowly, and it ended up taking me a week to finish it. I'll definitely have to try making fudge one day......

IMG_4804
32 cm ice cream! $2.70

I'd been wanting to come here ever since reading about the 32cm on these blogs. It wasn't exactly the easiest place to find, and even when we found it, they told us that they only served the ice cream at 2:00pm. We came back here later because I wanted the ice cream so badly =]

We order a chocolate and strawberry ice cream ($2.70) and are delighted when we get it- it was so tall and pretty! Sharing it between the four of us (although the majority of it got eaten by my sister) made it way too easy to finish. We found the best way to eat it was to slurp off one layer of ice cream at a time- it comes off really easily, and makes it really easy to share!

IMG_5013
3 colour drink $4.50

Dehydrated, and tired after walking around for quite a while, we decided for one last stop before going home- market city food court. First we order a drink, this time, a three colour drink, which is unlike any other three colour drink I've had- it's got a lot of coconut milk! But it's delicious all the same. Despite the inviting smells of sizzling dishes (which did not smell as good as the ones in the food court before) and varaious other good food, we settle one yet another pad thai (our third one this day!)

IMG_5002
Pad Thai $8.50

....and a pad see ew which I forgot to take a picture of (how forgetful can I get!) This pad thai was definitely the best so far. Although the colour wasn't as intense as the others had been, the taste was better- a good combination of the tangy pad thai flavour mixed with just the right amount of sweetness was enough to satisfy our stomachs for the trip back home =]

Gumshara Ramen
Eating World Food Court
Shop 209, 25-29 Dixon Street
Chinatown

The Fudge Shop
Shop 267, Harbourside
Darling Harbour, 2000 NSW
Sydney, Australia

Smile Korea Mart
630 George Street, Sydney

Thursday, June 3, 2010

Pai Pau 排包

15 Comments
When I was about 12-ish, I had a slight obsession of reading books so much so, that I even brought along books on holidays. Our luggage was always overweight by the time we got back to Australia, as a result of the amount of shopping we’d do, so, much to my dismay, my mum would only let me bring two books. She never specified how thin the books had to be, and so I always brought my thickest books, which can get pretty thick when some of them were like three books in one….hehe

Pai Pau

Of course, I grew out of that phase (eventually) and nowadays, you’ll more likely catch me in the food section of a bookstore than the fiction section. And I never take books with me overseas anymore- I bring books back =] My cookbook collection is really small, compared to my collection of novels but I’m not quite sure what’s big, and what’s small- which makes me wonder, how big is your cookbook collection?? I have books which I buy, intending to try most of the recipes and some which I buy just because it’s cheap and the pictures pretty (and there’s a slight possibility I’ll try one of the recipes). And then there are my Chinese cookbooks- the ones which undoubtedly get used the most.

I love my Chinese cookbooks for a very simple reason- they have the recipes which appeal to me more than anything else. Because no matter how much I love to try new things, I’ve found that the food I like the best is definitely Asian. Perhaps it’s because I grew up eating asian food, but I prefer soft fluffy bread to crusty sourdough, I prefer soft and light sponge cakes to rich and buttery butter cakes, congee over porridge……the list goes on. The Chinese cookbooks I've seen are significantly different to the English ones I read- for one thing, they are almost all glossy, colourful and full of pictures (even if the photography isn’t any good…..) They also have a love of including step by step pictures.

IMG_0275

Unfortunately, I don’t can’t read Chinese. But somehow, I manage to work my way through those recipes, either through the pictorial guides, the (terribly) translated English or pestering my mum to read them aloud to me at times. Yes- my mum reads me cookbooks =] Which is why I can now slightly manage to read words such as sugar, salt and flour.

On my (sort of recent) trip to Hong Kong (which I have yet to finish blogging about.....), I purchased a book on breads 'Hong Kong Breads' by Yau Yung Ling. I've taken an interest into bread making, ever since my first successful loaf and the realisation that the only reason my bread attempts failed was because of dead yeast. One of the first recipes I attempted was this Pai pau (排包- which literally translates to rows of bread), a common bread in Hong Kong, which is pretty much a basic asian bread dough which is shapped in rows which you pull apart to eat.

I love pull apart breads. I love how you can feel the incredible softness of bread as you rip it apart, before you take a bite and feel the fluffiness. I even like to pull my sandwiches apart- when I'm at school, I like to pull of each of the crusts, one side at a time, and eating them before starting on the centre. Which I why I knew I was going to try this bread. The bread dough used in this recipe has a slightly high butter content to the basic dough used in the rest of the book, giving it a bit of a better flavour.

IMG_0287

It seems however, that I can never escape disasters in the kitchen and my first attempt at this resulted in an almost inedible loaf. I'd (once again) used yeast that had been left out for too long. I've since read that yeast can be stored in the freezer so hopefully, I won't come across that problem again for another year or so......

The second attempt was a lot better, and yielded a very soft and fluffy bread. The only problem was I'd put the rows too close together during the proving, and so the rows all moulded into one after rising and baking, resulting in one loaf which wasn't really pull-apart-able. Well, not neatly anyway. So we cut it up =]

IMG_0272

It didn't actually turn out as soft as it looked in the cookbook, and not quite as soft as asian bakery bread, but we loved it just the same!

And here's a tip from the book:

IMG_0737
Don't knead with your head!!


Pai Pau (or, as named in the book, Egg and Butter bread)

Recipe from Hong Kong Breads by Yau Yung Ling

Ingredients
476g strong flour
112g caster sugar
7g yeast
56g butter
168g
warm water
1 egg
1 egg yolk
56g milk
Some yellow food colouring-
egg yellow or lemon yellow (optional)
4g bread additive (I used bread improver)
some beaten egg for topping

Place all ingredients except butter into bread machine (according to the directions your bread machine manual!) Set to Dough function. Add in the butter after 8 ~ 10 mins into the kneading cycle. When the dough has finished kneading, remove dough from machine and put it in a bowl covered with cling wrap Leave to ferment for 30minutes.

Divide the fermented dough into 16 pieces.
Roll each piece into a long sausage like shape. It should be a bit longer than your palm- about the width of a loaf pan.

Place 8 pieces of rolled dough next to each other in a row, so that they form a rectangular shape. Leave small gaps in between them. Do the same with the other 8 pieces, unless you want a huge/long pai pau.

Leave to ferment for 45 minutes or until double in size.

Brush egg wash on top and bake at 200oC for 15 minutes or until
golden brown.

Related Posts with Thumbnails